I have determined it is too difficult for me to try and keep everything up to date in my personal facebook page, my cake facebook page, and blogger. So for now, until I have a chance to update all the entries into blogger feel free to look at my cakes over on facebook. The album is public, so even if you don't use facebook yourself, you should still be able to view them. Thanks, and enjoy!
https://www.facebook.com/media/set/?set=a.149153515118660.28511.149151475118864
Friday, July 1, 2011
Saturday, January 8, 2011
Eyes of a Tiger

01-08-11
A 9 x 13 Marble cake with Orange and Navy colors, and a touch of Tiger eyes. This cake was for a first grader who apparently loves Auburn as much as the rest of her family. The cake is covered in fondant and the tiger eyes and face were cut from fondant using an exacto knife that stays in my cake cabinet just for this purpose. I'm happy with it's outcome, though I feel the need to practice my handwriting more often.
90th Elegance

01-08-11
This is an orange flavored 12" hexagon cake with Orange Marmalade filling in 3 layers due to torting and layering. The cake is completely fondant and gumpaste free. To make these flowers in a rush to put on the cake I enlisted the help of my freezer once I piped each flower onto a waxed paper square and flowernail. I wanted it to be simple, yet elegant. I was told she likes flowers, so I did my best to incorporate them into the design in mind. The borders on top and bottom are both mini pearl drops. The actual color of the cake is not pumpkin orange, sorry about the lighting, but a shade of orange that I think complements to flowers very well.
Sunday, December 19, 2010
Gorgeous Gator

A Cake built for a graduate. Can you guess which college she just graduated from? Well, this was a 12 inch round 2 layer cake that was Orange and Blue through and through. The bottom layer was orange flavor, and the top layer white cake simply colored blue. The base border was gumpaste lace on the marbled fondant. The top tier was a golden butter cake in a 7 inch oval. It's base border was balls of fondant. Topping the orange fondant was a fondant creation inspired by the University of Florida's emblem. However, unlike Al, this gator has an extra tooth and hasn't gotten his jaw opened as wide. I received rave reviews, but would like to give a special thank you to my mother-in-law for doing the actual baking of the 12 inch rounds for me.
Friday, December 17, 2010
DARE to do Cupcakes

My version of a cupcake cake. 136 cupcakes frosted with white icing topped with gumpaste letters. I had to do a dry run of the cupcakes in a rectangle to figure out how large to make the font. I did contact the logo owner for permission before I attempted this. I was amazed at how quickly they responded with a Yes! Transporting that many was a bit tricky, but we managed without having any cupcake casualties.
Wednesday, December 8, 2010
Halo Reach Grunt

12-04-2010 This was a cake I made in honor of my husband's birthday, as well as his yearly LAN Party with friends from all over central Florida and Aruba. Since they are constantly playing Halo Reach through Xbox Live, I thought it only appropriate to recreate a cake in the shape of one of the characters that appears in the Halo games. I was wondering what I should make and turned to my son and asked what flavor cake I should make. After listing the typical Vanilla, Chocolate, and Marble, I then said Confetti. As soon as the word came out of my mouth the cake design was already forming in my mind. We agreed that Confetti would be a great choice, because you can't think of Halo and hear the word confetti and NOT think of a Grunt.
For those of you who do not play video games, or are not familiar with this particular game, there is an option that can be turned on called "Birthday Party". When the Birthday Party skull is turned on the result is children voices cheering an excited "Yay!" while confetti is strewn around only if a head-shot is made on a Grunt.
My husband took some still shots from the actual game so that I could use them as reference photos for the cake. I made the cake out of 2 oval, one 6 inch round, 1 regular cupcake, 4 mini cupcakes, buttercream frosting and fondant. Though I do not believe the actual cake had the detail I wanted to give it, I am impressed by only decorating for 6 hours and not really putting too much planning into it. I just started it and kept on going until it was finished all in 1 day. It seemed as though it was enjoyed, but I was informed they were kind of freaked out by the fondant peel away skin, as well as the face, so they ate the rear of the head and left the rest.
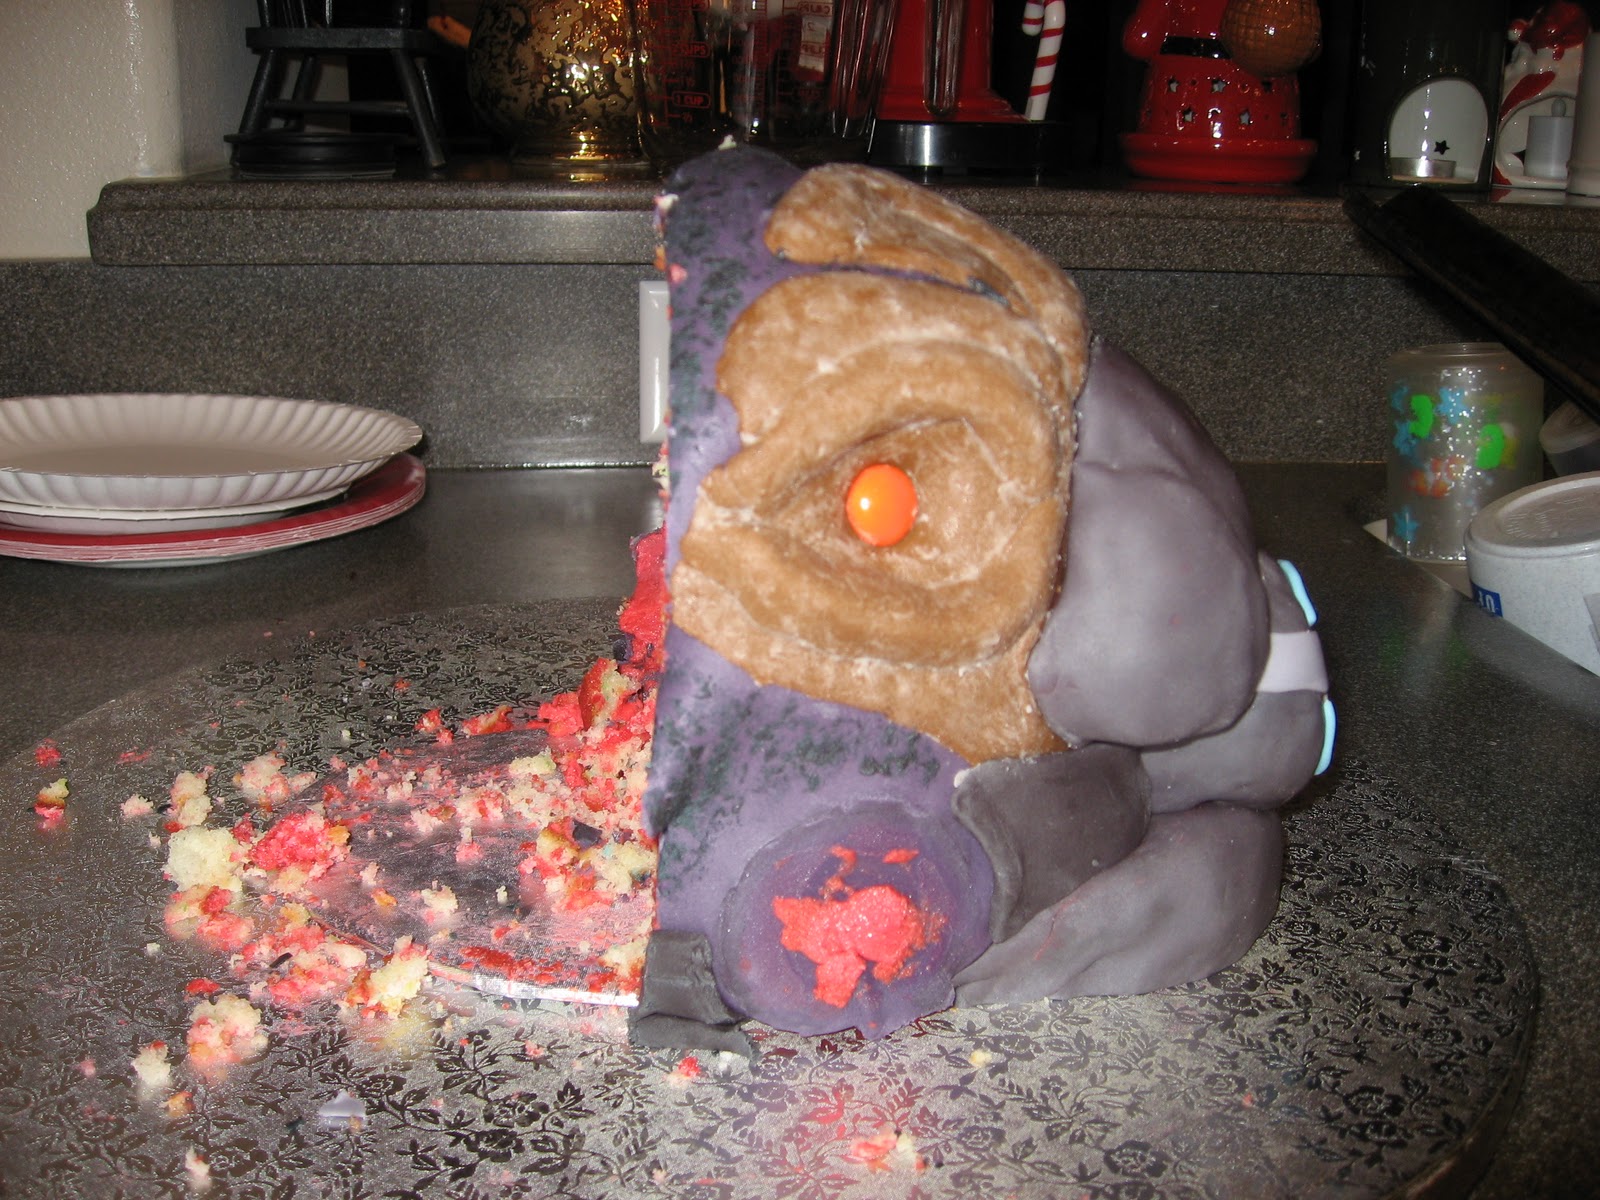
I was informed AFTER using the red icing to stack the layers and make the crumb coat that Grunt blood is in fact blue, not red, so sorry for that inaccuracy.
Saturday, November 13, 2010
Rose in Chocolate

A cake for a woman who loves the outdoors as well as chocolate. The request was simple, but the task proved complicated, as a ran through many designs in my head. I think I captured it nicely with this final design being a chocolate lover's delight. Chocolate frosting covers a chocolate cake hill that has been lovingly situated with home made molded chocolates. Atop that hill in the middle of a small, green, grassy butter cream pasture lays a chocolate cake made to mimic a terracotta pot. A single rose colored gumpaste rose rests inside with plenty of chocolate frosting soil and a few hand painted, glistening fondant leaves. The sides of the cake are simple, yet elegant with the hint of nature also in the form of hand made chocolate leaves.
Monday, November 1, 2010
An Apple A Day Does What?

11-01-10
Cupcakes in the form of apples. Tootsie roll stem and Brach green apple fruit slices top a cupcake covered in pink icing and rolled in red sprinkles.
Saturday, October 23, 2010

Wednesday, October 20, 2010

Saturday, September 18, 2010

Monday, September 13, 2010

Sunday, August 29, 2010
A Pond

08-28-10
This is my final for my fondant class I began on my birthday this year. It doubled as my sister-in-law's b-day cake. This was not only the first time I ever covered a cake in fondant, but also the first time I had ever made a hexagon cake. It was a tad tricky to cover, but I managed to do it without tearing it. I had sculpted fish, lily pads, water lily centers, and bubbles earlier in the week so that they had time to dry and harden. The actual water lilies were made the night before. The cake itself was a 2 layer marble cake iced with cream cheese frosting. The base border was a fondant rope using the shell imprint tool. I dusted the imprints, lily pads, and fancy tail gold fish with green pearlized dust to give them some sparkle. I enjoyed working with fondant, as it is easier to make pieces in advance, cutting down on the stress of having to do it all directly on the cake once it is iced smooth.
Monday, July 19, 2010
Haunted Hedge Maze Cake

It was particularly difficult for me to figure out what the maze really looked like since there is only the one view from one particular angle on the shirt. I tried several different techniques and even tried contacting the artist to find out what his inspiration hedge maze was, but received no reply. In the end a combination of Inkscape and old fashioned graph paper and pencil prevailed.
I used 2 butter cake mixes that I tinted green. I knew that I was going to carve out the maze so I baked it one day and the next began the maze prep.
I began cutting the paper pattern for the maze out with a regular pair of scissors, removing what would be the inside of the maze. I then realized I was going to have to leave certain pieces connected in order to ensure the maze stays properly proportioned the way I had it on paper.
Once the pattern was finished I pinned it to the top of the cake and began using a hem gauge to outline and remove the cake from the inside of the maze. I thought about leaving it without any icing once I had it carved out. However, what's a cake without icing?! So I decided to apply butter cream icing to the top of the cake, making sure none was actually inside the maze itself. My husband then reminded me that I needed to add texture to the icing, as it is meant to look like hedges after all. So I spent some time with a toothpick and roughened up the icing I worked so hard to smooth.
Pac-man and the ghosts were made using a technique I found on a website that I follow (www.snackordie.com), called cake balls. It is crumbled cake and icing mixed together and then cooled. Once cooled they were covered in melting candy that I had tinted the appropriate colors. They then had to return to their cooling chamber, AKA the fridge. After removing them from cooling in their little candy coatings I had to carve away the extra and smooth it out a bit.
Once they were done I added them to their places using the picture as a guide. That's when I added the eyes on Pinky and Inky to make sure they were looking the right way for their final photo shoot.
Toothpicks were definitely used a lot in this cake, but strictly for adding icing, sculpting, and carving. This cake, I am happy to say, is 100% edible without any support structures, and was even nice and moist.
I just hope that I did the artist justice in turning it into a cake. I hope you all enjoy seeing it as much as I did making it!
After playing with Picasa I also figured out how to do a video, so here it is as well. Enjoy! :)
Saturday, July 17, 2010
Watching the Snow Fall

I had originally intended to carve a cake for an entry into a contest called Threadcakes. However, when I leveled this one I found way too many air bubbles for it to work for my intentions. So, instead of wasting a perfectly edible cake I decided to turn this one into an entry and try again for the other later.
I chose this design because I was looking for one that used some frosting colors I already had made from previous cakes. I had enough black to cover the cake so I began looking for a design with a dark background, yet simple so I could get this done and move onto my intended design.
The cake itself was a sprinkle Duncan Hines mix that I tinted green. This makes no since for this design, but it's what I made. I had only one 9 x 13 pan so it took me an hour to bake both layers. Once they were baked I leveled them and used some green "cookie icing" as the filling and stacked them. Then I trimmed the edges about 1 inch back so that there would be no gaps in between the layers.
Once the cake was assembled I prepared the canvas. I spread the Black frosting over the top and each side. I then let it set for 10 minutes to begin crusting. After that time limit was up I smoothed it with parchment paper and my spatula and did some touch ups with Viva paper towels.
While waiting for the icing to crust I began my pin prick cheat sheet. I took the image from the website and inverted the colors and printed it to the size I would place on the cake. I then placed the printout onto a clean towel and used a quilters pin to make the pricks. I only pricked the people, a few snow flakes and stars for reference points, and the clouds. I didn't want it to simply be a stamp and trace cake, I wanted to see what I could do on my own to make it look identical. Once it was finished I laid the paper onto the top of the cake and lightly pressed it into the icing leaving a slight indentation in the black icing.
I started decorating by following the trace lines I had made for the people using white butter cream icing with a tip 1 on the bag. Once I finished them I stepped back and realized that I forgot that the people were green. Instead of starting all over, I decided to fix that later by mixing some food coloring and clear vanilla extract and paint them. It worked so well, that I decided to do the rest of the colors on the cake the same way. I actually think that was my favorite part. After all, it's not everyday that you get to paint the stars.
I moved onto the clouds and snow flakes, leaving the stars for last using the methods previously mentioned. I was particularly impressed with myself for not getting lost in the blue lines that the people were standing on. I did not prick those out at all and was hoping it would be really close to the original design. I'd say it was a pretty good job for free hand.
After it was all done I decided to put a border on the base of the cake. My husband suggested that it match what was going on on the top of the cake. So, taking his advice we have blue lines, white snowballs, and yellow stars that make up the border.
Overall time to complete: I have no idea. I have 2 kids that I had to stop for, and great events such as the Star Wars at the library that we just couldn't miss(501st Legion - great job btw!). If I had to give a guess I would say a total of 6 hours. I baked and iced it on one day and the next began the decorating. I did try a half of a piece and found it to be particularly good. My daughter stole the other half while I was taking the eating it picture. I gave the rest to a family with a 16 year old to dispose of for me. I'd be surprised if any of it was left by the time they got home.
Friday, June 18, 2010
Topsy Turvey Tinkerbell

06-18-10
My first Topsy Turvey cake, made for my daughter's third birthday. No Fondant, though it probably would have been easier if I knew how to use it. It is strawberry cake and butter cream frosting. All the plants and foliage were Tinkerbell inspired.
Friday, May 21, 2010
Tranquility

05-21-10
The requested cake was to be an "oriental" design. This mini Japanese Zen Garden is made from an 8" x 8" square butter cake with buttercream frosting. The black frosting is a chocolate buttercream dyed black. The top of the cake was cut to leave a square recessed well. It was frosted with buttercream as a "crumb coat". Inside the well are crushed rice crispies to use for the sand. The rake is made from Pocky that was cut and glued together using a melted hershey's kiss. Candy rocks were placed in the sand and pattern was made using a fork around the stones. Bamboo in pale green was piped on the sides using a tip one, while the Chinese kanji symbols were piped in white using a tip 2 and a toothpick to shape the details. A 100% edible creation.
Saturday, April 17, 2010
Zoinks!
.jpg)
04-17-10 This is a 9x13 2 layer chocolate cake with chocolate icing filling and buttercream frosting for the decoration. The requested design used air brushing. Since I do not have the equipment to do an airbrush, I had to use a piece of paper and cut out the desired design and place it on top of the cake and buy Wilton's Color Mist food color spray. This was only the second time of using it in over 5 years, but the first time to use it to make a specific design. I used a tip 12 to create both the top and base border and a tip 3 for the details of the orange swirls and bats, as well as the writing. Overall a very happy recipient, and a very tasty cake even if I do say so myself. The chocolate cake itself was done from scratch, as I have yet to find a boxed chocolate cake that tastes good. Thank you Hershey's for the recipe online.
Saturday, March 13, 2010
Butterfly Cake for the Birthday Girl

03-13-10 This is a 6" round cake specially made just for the birthday girl turning 1. Her party was decorated with the 1st birthday butterfly theme from Oriental Trading Company. This is the number one that the butterfly was hugging on the themed paper products.The one was piped on with a tip 5 and then a paint brush used to feather it into the center. The vines, blue flowers, and leaves were placed just as they were on the paper plates.The base border was a simple pattern of dots with a leaf placed after every fifth one.
Frilly Hearts - Butterfly

03-13-10 This was the cake for the party attendees. It was a yellow Butter cake with buttercream filling. The top border was my first attempt at a reverse shell. I am rather pleased with how it turned out. The sides had four frilly hearts that held a grouping of three dark pink flowers with yellow centers and three green leaves. In between the hearts was stringing. The base border was a regular shell border. The top held the requested message as well as a representation of the butterfly that was on the paper goods chosen for the theme.
Frilly Hearts - Princess

03-13-10 Since the party was a joint one for her and her sister, I wanted their cakes to match, but be different. The sides of the cake have the same frilly heart filled with a grouping of three deep pink flowers with yellow centers and three leaves. Also, like the other cake the base border is a shell border and the top border, a reverse shell. The difference on the sides is the design for the stringing. The color was tinted a deeper pink to better fit with the Disney princess theme. The top of the cake had the requested message as well as the Disney princess crown design. This cake was triple chocolate fudge with fudge chocolate icing as the filling.
Saturday, February 13, 2010
Strawberries

02-13-10 This was a cake created for a party for a little girl turning 3. The cake was a 9 x 13 strawberry flavored cake of 3 layers filled with buttercream icing.The sides of the cake were striped to match the bow and the top of the cake was iced pink with darker pink strawberries polka-dotted like the hat. There was a blank space left in the center for the candle that was the shape of Strawberry herself. The writing was done in white icing, with the top border as a white zigzag and the bottom border white stars. The strawberries were drawn on with a tip 12 making a filled in "y" shape topped with a tip 14 star in green. Using a tip 1 to place the curly vines on the tops of the strawberry leaves really made a finishing touch.
Monday, December 28, 2009
Left 4 Dead

12-28-09 This is a really large brownie covered in fudge frosting decorated in honor of the Left 4 Dead video game, so I'm not so sure it really belongs here. Thanks for the candy corn inspiration from http://chiccookiekits.blogspot.com/2009/10/emotional-life-of-candy-corn.html. I found a wooden helicopter in a dollar bin at one of my favorite stores and had to hand paint it from yellow to green, and then came the details. I had to hand paint a pale green candy coating on each zombie before applying the faces and blood with a cakemate writer. The wording was Wilton candy melts that I tented zombie green. I printed out the font on my computer and placed a sheet of waxed paper above it taped to the counter top. I piped the melted candy onto the letters and let them dry. The lettering was super easy that way.
Monday, December 7, 2009
I'm A Pepper

12-07-09 This cake I made for someone that I knew would appreciate Dr. Pepper as much as I do...The cake itself is a Dr. Pepper cake recipe and I made a buttercream and added some Dr. Pepper to it to give it the flavor too. "Hy" for Happy in place of "Dr" for Doctor. I looked up a font to use to get the rest of the letters the correct way. I had to use almost an entire container of Burgundy food coloring and still added some cocoa to it to get the color correct. This was kind of spur of the moment, but I did want to do something cool for her.
Sunday, November 1, 2009
Polka-dots

11-01-09 Chocolate cake with chocolate frosting inside. Hand made chocolates on top. Buttercream frosting for all other decor, save the hand made chocolate swirls. The image that inspired my creation was the picture that was on an evite for a birthday party I was asked to attend. All the decoration on the sides were made using a tip 12 and flattening them down.
Monday, October 26, 2009
Chocolate Everything

10-26-09 I made this one to take to a potluck in honor of a couple very special ladies in my life. It was chocolate cake with white chocolate icing filling. I also tried out for the first time making hand made chocolates for this one. The candies came out pretty well, I may start using them in other cakes now that I have a little confidence in how to make them. All that chocolate needing something to pop on the cake. So I added a small amount of aqua butter cream icing on the sides as well as a few dots on top.
Friday, September 18, 2009
Feeling Blue

9-18-09 This was created for a family birthday party for 9 Birthday people. I went through several designs, and finally, I just winged it after a few minor disasters with this one. What I learned: 1) ALWAYS level the bottom layer, even if you're in a hurry to get the second on the top so it doesn't stick to the pan. 2) Always make one and a half the amount of icing suggested by the pan for it's size. 3) Make sure all your ingredients are in your home before beginning the process. 4) Don't be so hard on yourself, Mrs. perfectionist, it's just cake. It's not like it's the cure for cancer... Ok, I'm still working on number 4, but I still had fun with it, and that's the important part.Though I am not happy with the top of the cake at all, I do like how the sides turned out. It was a marble cake with butter cream icing as the filling as well as the decor.
Sunday, September 13, 2009
Word World
.JPG)
09-13-09 Word World! Yay! Did cupcakes and a 6 inch round for the birthday boy. Funfetti cake with cream cheese icing. Sprinkles on the cupcakes and a decorative paper medallion placed in each. The small cake was decorated like the logo they have on everything in word world. 3 rolling hills done with the grass tip so the grass is at three different angles to distinguish them apart from one another. Complete with white fluffy clouds in a blue sky.
Thursday, August 27, 2009
Seashells and waves

08-27-2009 I admit I cheated a bit in the fact that the seashell chocolates are pre-made by a Belgium company. I put waves complete with foam on the sides of the cake and tinted the top sand color. The cake was a Funfetti one filled with pudding in between the layers of cake. The font I also used a trick to create. In order to achieve the penmanship I desired I printed out what I wanted to say on the cake in the correct size and font on a regular piece of paper. After printing it out I used a quilting pin and punched wholes into the paper following the lines of the type while it was over a clean folded towel. Then I placed the whole punched paper onto to the cake where I wanted the font. I then sprinkled cocoa powder over the paper and used a small paint brush to ensure the cocoa went through the wholes. Removed the paper to find my outline and traced it with my desired frosting.
Friday, August 7, 2009
Chocolate Lasagna

08-07-09 mmmm, chocolate lasgana... I got to make my own birthday cake this year as an added treat to getting my new Hamilton Beach mixer as my present. I absolutely love it! The top design is made from melted mini chocolate chips. The cake is a butter fudge and the icing is an almond butter cream. 3 layers of cake, 2 inner layers of icing include chocolate chips to infuse even more chocolate in every bite. mini chocolate chips are stuck to the lightly iced sides. In true lasagna style, the layers of filling are trying to escape all along the sides. Doesn't it just look delicious.
Wednesday, July 29, 2009
Just because

07-29-09 I just felt like making a cake with my kids, so I made this one. I used strawberry cake and canned strawberry frosting iced in the "casual" frosting method. Jumbo confetti sprinkles randomly placed on the sides by the kidos. I used two cookie cutters to put an imprint into the top of the icing and then sprinkled colored sugar sprinkles on the lines it made. The larger heart was made of purple sprinkles, while the smaller was green. The outside edges were outlined by more jumbo confetti sprinkles, half blue, the other half yellow.
Saturday, June 20, 2009
Cinderelly

6-20-09 This is actually a replica of Cinderella's dress that the mice and birds made for her, that eventually got ripped to shreds by her step-sisters. I thought that to be kind of appropriate since we would be cutting it to pieces in the end. The dress was a cream cheese pound cake in doll cake pan form, with 3 more layers of 2" cakes to get enough height to put an actual doll in the middle. All the icing was butter cream that was hand smoothed, colored, and piped by yours truly. I couldn't get bows to look like anything other than a mess of frosting, so I ended up buying some fabric ones at Joanns. They just so happened to match the color I had tinted the frosting perfectly. The torso of the doll was also decorated with butter cream. The cupcakes were strawberry with canned vanilla frosting and jumbo confetti sprinkles. The cupcake papers and crown toothpicks were a Wilton combo thing.
Wednesday, April 1, 2009
Scribble Art

4-1-09 Cupcakes were strawberry cake covered in butter cream icing. Since it was for a very active 4 year old I decided scribble art would be right up his alley. Using primary colored icing I simply "scribbled" the colors on them in various patterns. I wanted to stick a crayon in each one, but with all the scare about things from China containing lead around this time, I figured it was better not to. There are candles that are made in the shape of crayons that I could have used, but ran out of time to go on a hunt for them.
Saturday, March 28, 2009
Batter Up!

3-28-09 Made 24 cupcake baseballs as well as a 6 inch cake for the birthday boy. The cake was chocolate and all were covered with butter cream frosting. I used the grass tip as the bottom border of the 6 inch cake. Light blue sky colored icing for the rest of the cake. I used a cookie cutter to imprint the outline of the baseball cap. The baseball cap was for the Angels as Nolan Ryan had once played for the team and this was the birthday boys name sake. Two flying baseballs were on the side of the cake as well. The most difficult part was placing all the little red lines of stitching on each cupcake. I was definitely glad to see them eaten as I had been looking at them up close for far too long a time.
Saturday, March 14, 2009
Nature is Tier-ific

This is my first attempt at a tiered cake. It was a lot easier than I was anticipating to actually tier the two cakes, but still a tricky experience to undertake. Joe is an experienced landscaper and irrigation professional who loves chocolate. So, it made since to use an irrigation piece for the 0 in 30 with some blue tinted piping gel as water around it. Leaves outline the top tier with kindergartner style trees on the sides. The top of the bottom tier is covered in green butter cream icing using a tip to create the look of grass, with a few red and white flowers randomly placed in the meadow. The sides of the bottom tier were simply frosted with chocolate icing and chocolate cake crumbs placed around as the border to resemble real soil. It was a lot of fun to make, but definitely stressful to deliver. I was so afraid something would happen on the ride it felt like 3 hours when in reality it was probably only 15 minutes away.
Thursday, March 12, 2009
Dog Speaks

03-12-09 This cake was created for a birthday party for a 2 year old who loves a particular show that airs on PBS. I hope that my attempt in recreating this talking dog in an icing form at least resembles her. I thought it would be a neat idea to use the phone cord to write the name, but it could have used a few more loops in the a and n. The border on top was rosettes, and black dot outline of a bone was in three places on the side of the cake. In between the bones were the letters of the alphabet, as Martha ate alphabet soup to allow her to speak. The cake itself was a white cake mix and butter cream icing. The cupcakes were nothing spectacular as far as decorating goes. The party was for a girl and since the theme was puppies I simply iced the cupcakes, used pink and purple sugar sprinkles and them piped on a little paw print on each one to tie them into the theme. It was fun to make, but a word of advice when it comes to using the black icing...only put it on the cake at the most the day before the cake is presented or else it bleeds, and keep it out of the refrigerator as the moisture in the fridge will also make it bleed. Hope you liked this one
Monday, February 2, 2009
Dr. Pepper cupcake

2-2-09 Chocolate cupcakes that were infused with a little bit of Dr. Pepper. I did this by using Dr. Pepper in place of the water the cake mix that I used. Topped with some canned chocolate frosting and a maraschino cherry. Delicious.
Tuesday, January 13, 2009
Key Lime Pie

Here are some facts about the Key Lime using my favorite online resource Wikipedia:
The Key lime (Citrus aurantifolia or Christmas Swingle) is a citrus species with a globose fruit, 2.5-5 cm in diameter (1-2 in), that is yellow when ripe but usually picked green commercially. It is smaller, seedier, has a higher acidity, a stronger aroma, and a thinner rind than that of the Persian lime (Citrus x latifolia). It is valued for its unique flavor compared to other limes, with the key lime usually having a more tart and bitter flavor. The name comes from its association with the Florida Keys, where it is best known as the flavoring ingredient in Key lime pie. It is also known as West Indian lime, Bartender's lime or Mexican lime, the latter classified as a distinct race with a thicker skin and darker green color.My key lime tree seems to produce fruit between September to January. and I haven't noticed any thorns either, but they are DEFINITELY key limes.You can tell because they are small, really acidic, have that thin rind, and turn yellow when they are ripe.However, what I really find interesting about the key lime that is not listed on the site is the fact that it is a lime that is green on the inside and yellow on the outside.
C. aurantifolia is a shrubby tree , to 5 m (16 ft), with many thorns. Dwarf varieties are popular with home growers and can be grown indoors in winter in colder climates. The trunk rarely grows straight, with many branches that often originate quite far down on the trunk. The leaves are ovate 2.5–9 cm (1–3.5 in) long, resembling orange leaves (the scientific name aurantifolia refers to this resemblance to the leaves of the orange, C. aurantium). The flowers are 2.5 cm (1 in) in diameter, are yellowish white with a light purple tinge on the margins. Flowers and fruit appear throughout the year but are most abundant from May to September [1] [2].
One of my dad's favorite desserts is the key lime pie. He was born in Miami so maybe that had something to do with it, but maybe not. He is actually coming for a visit and will be helping me repair a few things around the house. This little blog addition is his payment for all that help. It's really a simple recipe and doesn't take much time to bake at all. Plus, it tastes sooooo good. Just click on the image to get a better view of the recipe. Too bad they don't make scratch and sniff blogs.
Tuesday, December 23, 2008
Computer Language

12-23-08 A bit of a throw back to the computer geeks out there. I made this one for my brother-in-law who works in an IT dept. When writing the message on top I noticed my font was a bit large to fit on the cake. So I decided to put the ending elements that wouldn't fit on top on the sides. Hince the "Find the missing ELEMENTS" phrase on the front of the cake. Though this looks like fondant, it's simply butter cream frosting that I worked on getting smooth.
Sunday, November 23, 2008
Elegant in Gold

11-23-08 Believe it or not, these are birthday cakes.One was chocolate, the other carrot cake. Golden Icing with pattern imprints in dots on the side. Each was topped with a flower ring and 3 ivory candles.
Monday, November 3, 2008
Tailor made

Friday, October 31, 2008
Clone Army

10-31-08 Here I attempted to create an army of edible clone trooper helmets. I simply used a box of coconut flavored cake mix and baked it into mini cupcakes. I used white cupcake papers and modified canned icing. By modified I mean that I had to add powdered sugar to the icing so that it would be stiff enough to keep shape and to crust slightly. The details were piped on in black cake mate icing using Wilton tip 2. The dome of the helmet was created by really piling on the icing, waiting for it to crust, and then making the point on top of the helmet by squeezing it gently between two index fingers. The size was perfect for the kids and by their standards just enough icing. I still didn't feel as though they were able to be recognized as what I had intended so I put a picture of a clone trooper helmet near the tray of them. It was a lot of work, so I suggest that if you are making them for a party you definitely want to get an RSVP from each guest before deciding to dive into this major ordeal. I made a total of 72 mini helmets with one cake mix and 2 cans of frosting. Hope you all are inspired to think up your own twists on the common cake to better fit your themes.
Tuesday, October 21, 2008
Classy

10-07-08 Elegant, yet simple Birthday cake. It was an orange spice cake with butter cream icing. I used piping gel and parchment to transfer the image onto the cake so that I could trace it with the icing color of my choice. In this case I wanted white. I thought it would go nicely with the skin tone color of the cake itself. I used a ribbon curl design on the upper portion of the sides and a tip 3 border at the base. A touch of pink on each star as well as a few randomly placed dots finish it off.
Monday, September 1, 2008
Thank God

09-01-08 Course I of the Wilton Cake Method is complete. Here is my final cake, a bit different from the text book version we were supposed to create, but no one said I couldn't use my own creativity here.
It is a French Vanilla Duncan Hines cake mix with a chocolate pudding filling. The icing is slightly chocolate by mixing a tube of Wilton Chocolate icing in with 3 cups of thin Buttercream icing tinted peach in order to give it the sand tone. 6 Roses in a bouquet with a mauve/purple bow. Shell border of white at the base of the cake accented with semi-sweet chocolate chips. The top border is a mixture of zigzags and stars with a chocolate chip topping each of the stars. Strings of purple on the sides of the cake to tie the color from the bow into the rest of the cake. "Thank God" written in green as a multi-purpose message. Thank God for chocolate, thank God my roses came out okay, thank God for the opportunity to take this class, and as a reminder to all not to forget to Thank God daily. Course II starts next week, but no need for a cake until the last class, but don't worry, my son's b-day is coming up soon, so there will be another cake posted in a couple of weeks.
Tuesday, August 26, 2008
Garden of Cupcakes

Monday, August 18, 2008
Pineapple Goes Girlie

08-18-08 Pineapple Inside-Out Cake Inspired from my daughters bathing suit. This is the first cake I made in Wilton Cake Decorating Class.
Pineapple flavored Duncan Hines cake mix baked in a single 9 in by 2 in round cake pan with Bake even strips. I leveled the top off of the cake while it was still in the pan. I then let cool for 1 hour and cut it in half to form the two layers. A mixture of "Stiff" icing and crushed pineapple (drained extremely well) laid in the center and then topped with maraschino cherries made up the filling. Iced smooth with Pink tinted thin icing just as the bathing suit was. It was very tricky to ice it so smooth, and my perfectionism was driving me crazy. I also found that my thin icing was a little too thin and had to keep it refrigerated once on the cake. The pineapple was drawn on top then done with a star tip. Two shades of green made up the leafs and the borders. Light green stars on the top edge are linked together with a string of white icing. The base edging was a string of dark green dots.
Wednesday, September 12, 2007
From the Big Blue

9-12-07 Made for a 3 year old's birthday. Decorated by myself with some help from my brother. The actual cake was baked by my mother-in-law, Pam.
How it was done:
The top was iced solid white and template for name was placed on top. It was then sprayed blue and then patted with additional white icing to give it the water look. Then the template was removed. Beige icing was placed on the sides to look like the sand an the bottom of the ocean and fruit roll ups cut in strips to made the seaweed. Dark Blue icing piped around the base and top edges. Nemo figurines purchased from the Dollar Tree placed on top with three candles. Happy Birthday written with a sea foam look. All different colored sugar sprinkled around the base to look like special sand. Viola!
Saturday, February 18, 2006
Fudge Force

Planet Hoth

Planet Hoth from Star Wars. This was the first cake I made on my own for a birthday of a friend who has an impressive Star Wars collection. I do not remember the type of cake it was, but there was a lot of coconut to signify snowy icy conditions. That little toy on top was something that came from a Burger King kids meal. Though I matched the color of the icing very well to the vehicle, I definitely needed some practice on my handwriting technique. 02-18-06
Subscribe to:
Comments (Atom)